Wednesday, June 26, 2013

California Lovin'!

A few weeks ago, I flew to LA to visit a college friend who lives in Long Beach.

I had no agenda; I simply wanted to get away from the endless Portland rain that seemed to occupy the entire month of May. And I'm SO glad I did. There is nothing like catching up with an old friend and exploring a new town. Long Beach is absolutely adorable, the beach is serene and there were TONS of fun vegan spots. Not to mention the weather was BEAUTIFUL every day (while it rained non-stop back in Portland).

Every morning I ran on the beach and every day we had a new adventure. From kayaking to wine tasting to visiting the Getty museum to just throwing the frisbee on the beach - every day was total bliss!

On one lovely afternoon, we decided to compile a vegan appetizer tray to pair with the beautiful Rose' I purchased at the wine shop where we wine tasted.


Thanks Brad and Angie!
This Rose was super special - lemme tell ya. Apparently, Angelina Jolie and Brad Pitt bought the Chateau Miraval estate in Provence and teamed up with one of the most famous winemakers in all of France to produce this absolutely stunning Rose. I'm a huge Rose fan in the summer, and this wine did NOT disappoint. To celebrate it in all of its glory, we paired it up with some Jalapeno Garlic Harvati Daiya, grapes, carrots, asian pear, Back to Nature Stoneground Wheat crackers, and Trader Joe's crunchy curls.

Talk about an amazing summer snack. The Daiya wedges are incredible - even if you don't like the shreds, I highly recommend the slice-able stuff. It has a great flavor.


The first day that I got into town, Davis and I walked around to all the adorable shops and checked out the bar/restaurant scene at the main strip of Long Beach near his house. As we walked by an unassuming looking bar/restaurant, Davis remarked that it had his favorite brussel sprouts dish of all time. That's a big claim and since there are few things in the world I love more than brussel sprouts, I insisted that we stop and see what these sprouts were made of.

Drenched and roasted in oil and balsamic vinegar and tossed with fresh herbs, capers, salt and (what tasted like) a bit of maple syrup, these sprouts definitely lived up to Davis's hype. They were perfectly crisped and so flavorful. We split the appetizer and it was the perfect amount for a mid-morning snack. My first vegan food in California did NOT disappoint :)


I'm not in California very often but when I am, I always make sure to indulge in one of my guiltiest of guilty pleasures is In-N-Out.

I can honestly say I haven't eaten fast food (with the exception of Subway maybe once or twice) since I was last in California and ate In-N-Out.

I know what you are thinking: "Umm...you are vegan...how can you possible find anything to eat and In-N-Out."

I know it sounds crazy, but I just order the "veggie burger" sub ketchup for sauce, add extra tomato and onions. And fries of course. I don't know how, but I promise this fast food combo still satisfies! Davis, the friend I stayed with, and Colin both thought I was nuts but agreed to try the patty-less vegan option instead of the regular burger and both were shocked by how much they liked it. Plus it's like...a dollar (instead of 4)...meaning you can even have 2 or 3 if you are really hungry and it is still much healthier (by fast food standards I suppose) and cruelty-free! Everyone wins!

Speaking of guilty pleasures...I almost never drink hard alcohol, but every once in a while I love a good Bloody Mary. Especially in California where - I swear - hard alcohol is as cheap or cheaper than beer (and where they don't truly understand what an IPA is), I think drinking a mixed drink is appropriate (even while watching a soccer game - near blasphemy!)

I was worried about finding a bar in the vicinity that was playing the match, but fortunately for me, a bar within walking distance of Davis's house was not only playing the match but also had this mind-blowing BLOODY MARY BAR.

Don't get me wrong, I've seen bloody mary bars before. And I've loved them. But this was a new level of Bloody Mary goodness. The bar was about 15 feet long and covered with every assortment of tomato-based bloody mary concoction in addition to various hot sauces, lemons, limes and other citrus, a plethora of pickled vegetables and at least 10 different varieties of olives. There was also a large plate of fresh veggies and herbs. It was like a delicious, alcoholic salad in a glass.

Now I know why they give you mini pitchers...gotta have enough room to hold all that stuff!

And, naturally, I went back to get seconds of veggies and pickles. Looove me some pickled green beans!

Wonderful :)


I would be doing all of my readers a huge disservice if I didn't mention Paradis ice cream.

Portland has a bevy of amazing vegan frozen yogurt places, but sometimes I just want an ice cream cone. And as much as I love Coconut Bliss, I get a little tired of the hardened, coconut-milk based ice creams.

So when I saw this adorable little ice cream shop's sign that said "Vegan flavors!" I was a little skeptical. But let me tell you, whatever Paradis is doing behind the scenes is pure magic. This was hands-down the best vegan ice cream I've ever had. Smooth and creamy and light and fluffy, it tasted like frozen baby angels.

We went down to this shop every night that I was here because I just couldn't get enough. The flavor (badly) pictures was the strawberry chocolate chip. They also provided a regular chocolate, banana, banana chocolate chip, and a couple of other flavors but the banana and strawberry were my favorites.

If you are in Long Beach or anywhere near a Paradis, you need to get on this vegan ice cream, STAT. You won't be disappointed.

Those were the vegan highlights of my trip! I love being able to travel and explore new vegan options. Everywhere I go it seems like I don't have enough time to explore all of the amazing vegan options available. It's so exciting!

Like here, eating some edamame and vegan sushi and drinking Sake at a sushi restaurant in Hermosa Beach.

Another amazing experience - thanks in large part to my wonderful friend, Davis. Can't wait to go back for more!!


Live long and prosper. And travel vegan.

Tuesday, June 11, 2013

Cauliflower Wings Revisited

Back and better than ever!

One of my all time favorite posts was my Cauliflower Hot Wings post a couple of months ago. Since then, I have made this satisfying appetizer numerous times and have perfected the recipe.

As such, I thought I would update the recipe and post some new pictures to get your mouth watering ;)

This last batch was made while visiting one of my very best college friends down in LA. He had seen them on my blog and asked if we could make them! So we did. Twice.

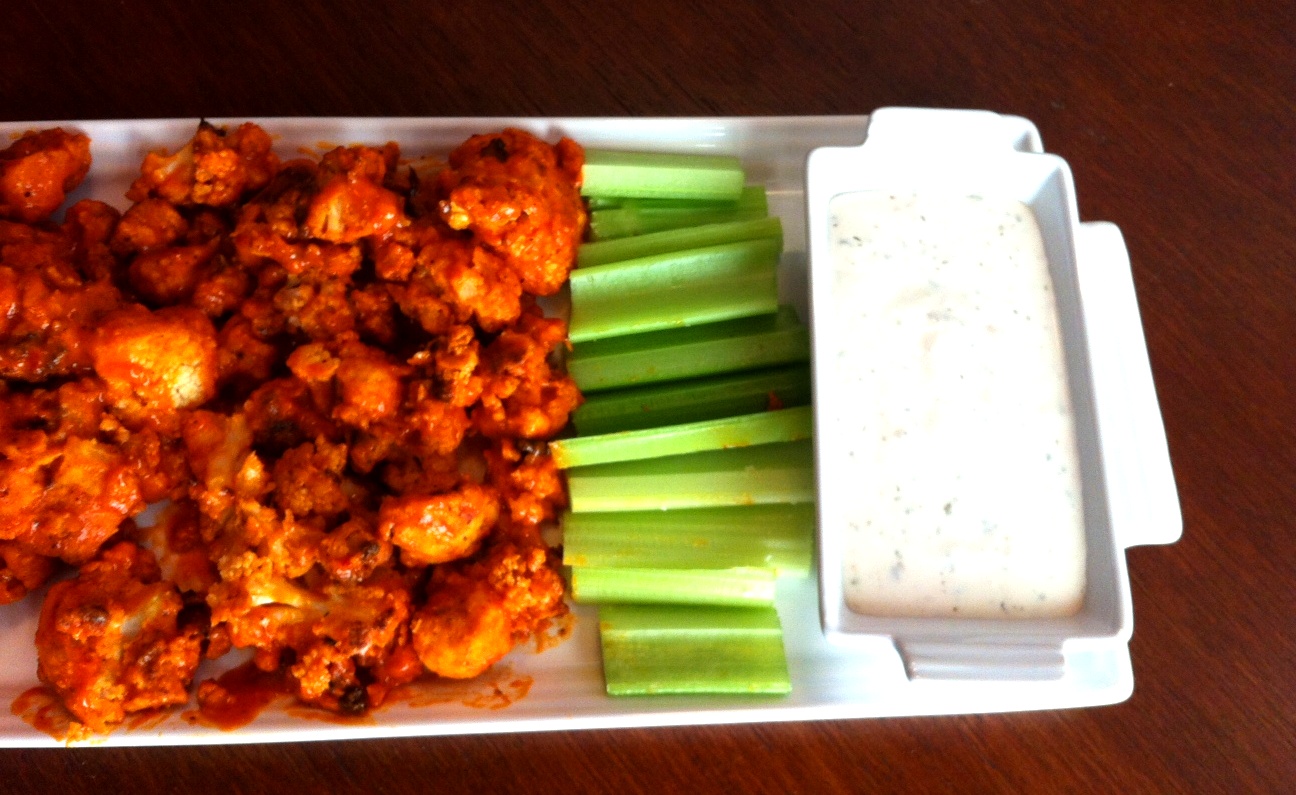
Paired with Follow Your Heart Ranch dressing, these "wings" were hands-down the best yet. They are crunchier, chewier, more flavorful, and - best of all - even healthier!

A couple important lessons I have learned through trial and error:
  • The buffalo sauce that you use is CRUCIAL. The better the sauce, the better the wings (this should be obvious but, of course, it wasn't)
  • The wings turn out best when baked at a relatively high temperature, broiled until just crispy, tossed with sauce and served immediately. This way they are crispy on the outside, chewy on the inside, and warm when served.
This time around we used the Wing-Time Buffalo Wing Sauce (the HOT version) and it was absolutely amazing. Favorite wing sauce yet, hands down. It had the perfect level of spice, creaminess and kick for these wings - plus it is sugar free, gluten free, all natural and preservative free! Also, instead of adding earth balance when heating the sauce, I just added in a bit of unsweetened almond milk and it seemed to do the trick!

OK - enough talk, here's the recipe:

Cauliflower Wings
  • 1 large head of cauliflower
  • 3/4 bottle of Wing-Time Buffalo Sauce
  • 1 cup + 2 Tbsp non-sweetened, plain almond milk
  • 3/4 cup chickpea flour
  • 1 tsp garlic powder
  • 1 tsp onion powder
  • 1 tsp curry powder
  • 2 Tbsp nutritional yeast
Preheat the oven to 450°F.

Lightly spray a large non-stick baking sheet with oil.

Separate/chop the cauliflower into florets.

Combine the flour, spices and nutritional yeast in a bowl and stir until well combined.

Coat a handful of cauliflower pieces in soymilk and then with the flour mixture. Place on the baking sheet and bake for 20 minutes or until crispy.

While the cauliflower is in the oven, heat the Wing-Time sauce in a medium sauce pan over low heat. Whisk in 2 Tbsp of almond milk.

When the cauliflower is looking crispy, turn it with a wooden spoon and heat the oven to broil. Allow the cauliflower to broil with the oven open for 5-7 minutes or until beginning to brown. Pull it out of the oven and place it in a large bowl. Pour the hot sauce mixture over it and toss to coat.

Serve immediately!


Isn't that beauitful!
We made it two nights in a row :)
 
Live Long and Prosper! And enjoy the beautiful bounty of summer!


Wednesday, May 29, 2013

Nayonaise Review and Trail Running

Goodness it has been a while!

Life has been crazy over the past few weeks. Finished my second year of law school in the midst of my hard drive crashing, my car getting broken into, working two jobs, Colin and I's 3 year anniversary, and running a couple half marathons!

Phew! So pardon the pause on posts. I've been cooking lots of delicious things and have a ton coming your way :)

For now, I have a little product review and a couple trail run reviews. Enjoy!


Nayonaise

Being a long-time lover of Veganaise, I had never tried Nayonaise, although I've heard great things about it. Nayonaise is gluten free, non-GMO AND made in the US - all things I look for in pretty much all of the products I consume.

I sampled both the Nayonaise Regular and the Nayonaise Whipped - each different in both taste and texture. I think I preferred the regular over the whipped, only because the whipped reminded me too much of Miracle Whip in terms of the texture and, even as a kid, I always preferred regular mayo to the whipped alternative. Plus the regular seems to hold up better for sandwhiches, in sauces and in dips.

The main differences I noticed between Nayonaise and Veganaise is Nayonaise has a slightly more whipped, fluffy texture, and a sweeter taste. Veganaise is a thicker, more dense texture and isn't quite as sweet. Nayonaise is a great option for things like a vegan Waldorf Salad or in something like this Spicy Aioli, paired with steamed artichokes!

Spicy Aioli
  • 3 parts Nayonaise
  • 1 part Spicy Mustard
  • 1 part Sriracha


Overall, very impressed with Nayonaise and stoked beyond belief for the free samples from the wonderful people at Nasoya/Vitasoy! For more info on Nayonaise, check out their website!

Trail Running

Since I have been out of school, a significant amount of my time has been devoted to trail running. We have had some seriously beautiful weather in Oregon (uncharacteristic for May) and I have taken FULL advantage of it. I ran two trails that I hadn't ever heard of until this year, despite growing up within 50 miles of each of them.

The first - Trail of 10 Falls in Silver Falls, OR - was one of the more beautiful places I have EVER been. It was a balmy 75 degrees and humid and I felt like I was in Hawaii with all of the lush foliage, sunshine and picturesque waterfall spray. Nowhere else (that I know of) can you see 10 distinct waterfalls on a single hike/run. I mean, seriously, this place was UNREAL. You walk behind 3 different waterfalls, all within a couple miles of one another. We went on a Friday and it was not too busy, but I have heard that on weekends in the summer the place is PACKED.

The trail itself runs somewhere in the neighborhood of 9 miles (a loop, not an out-and-back) but we added on here and there to make it about 10 miles. The trail is well maintained with nice, rolling hills and only a few rocky or gravelly spots. It is easily runnable in normal running shoes, although I imagine you would want trail runners if you were running there after a rainy spell.


Katie and I at Waterfall number 4 or 5!
 
I mean how incredibly beautiful is this place, right?! It's unreal. The trail, the waterfalls, the weather - everything about this place added up to a 10 in my book. It's one of my favorite places and favorite days in memory.


A couple weeks later I saw a picture of Dog Mountain on a friend's instagram account and thought: where ever this place is, I am going to go run there. Not a few days later, I ran it past my running partner and marathoner-extraordinaire, Katie, and she confessed she'd been dying to run there as well. So, despite having ran a half-marathon the day prior, we laced up our shoes and drove up to the Washington side of the Columbia Gorge to take advantage of the only nice day of weather forecasted for that week.

I will confess, I should have done a tiny bit more research before committing to this run, but in the end it was SO worth it. We got lost on the way there and ended up in some random person's private driveway, but once we had phone service again, we got it figured out. Part of the drive from Portland to Dog Mountain takes you over the Bridge of the Gods which was particularly fitting since I just finished Cheryl Strayed's book Wild and she ends her insane trek through the PCT at this very spot.

Katie and I -- summit of Dog Mountain
Anyway, when we got to the trail head, we paid for parking before opting to take the "easier" trail (3.7 miles to the summit instead of 3.1). I can now see why this trail is rated one of the most difficult in the Gorge. It is literally straight up hill the entire way up, over rocks and gravel and overgrown plants. It's not particularly technical, just steep as all get-out. It was 3.7 of the hardest miles I have ever run in my life. (The 3.7 down were significantly easier, although my quads were so angry with me the next day!)

After the 3rd or 4th person in the first quarter mile shot us a "you are crazy" look, I should have picked up on the signs of what we were in for. We were crazy. The trail is hard, even as a hike. But it's amazing what the human body can endure, and it is incredible how an individual can propel herself forward, simply by putting mind over matter. It was as taxing mentally as it was physically, but I loved every minute of it for what I took away from it. It felt amazing to challenge myself and I'd definitely do it again - although probably not the day after racing a half marathon.


So there you have it! Some Nayonaise and some trail runs! I have a lot more coming up for you in the next couple weeks so stay tuned!


Live long and prosper! And don't be afraid to push your limits every once in a while :)


Thursday, April 11, 2013

Califlower Crust Pizza w/Creamy Sundried Tomato Pesto

I have been pinning cauliflower crust pizza recipes for ages now - critically analyzing each one and learning from others' mistakes to figure out what worked and what flopped. Finally, I decided it was high time to take a stab at trying out my own.

I'm pleased to say it was a success!


A few pieces of advice:

1. Pre-heat your pizza stone. If you don't have a pizza stone, pre-heat your pan. Gives it a nice, crispy binding bottom right from the get-go.

2. Use flax eggs AND cornstarch. Makes the crust nice and think and will ultimately be a more successful binder.

3. Have some spray oil (I use coconut) handy for your hands (see what I did there) so you can quickly and effectively press the crust onto your hot pan before you burn yourself and before it turns into a gloopy mess.

4. Try to make the crust slightly thinner in the center and thicker on the edges. The edges cook much more easily than the center, especially once you put the toppings on so if you want it to crisp up nicely, try to make the crust thinner as you get to the center.


Cauliflower Crust
  • 1 medium head cauliflower, roughly chopped
  • 1/4 cup gluten free (or not) breadcrumbs
  • 1/4 cup chickpea flour 
  • 3 Tbsp nutritional yeast
  • 2 Tbsp flax + 4 Tbsp water
  • 1 Tbsp cornstarch
  • 1/4 cup Daiya (or other non-dairy cheese)
  • 2 Tbsp Dried Italian spice blend (basil, oregano, thyme or any other combo that you like)
  • Onion/garlic/salt to taste 


To Assemble 

Preheat your oven to 400 degrees F. Place your pizza stone or pan inside to let it warm.

In a small bowl, whisk together the flax and water to make a "flax egg." Set in the fridge to thicken up for about 10 minutes. After 10 minutes, whisk in the cornstarch.

Using a food processor, pulse the cauliflower until it resembles the texture of cous cous, maybe slightly coarser.

In a large skillet, mix the cauliflower and flax/cornstarch mixture over medium heat to "sweat" the cauliflower and activate the cornstarch. Let it warm, turning the mixture slowly with a wooden spoon for about 5 minutes.

Turn the heat off and let cool slightly. Then, mix in the remainder of the ingredients, using the wooden spoon until everything is combined. Spray your hands down with oil and form the dough mixture into a ball.

Remove your pizza stone from the oven.

Spray the stone down with oil and spray your hands at the same time if you need another coat. Quickly place the dough mixture onto the hot pizza stone. Press the dough down onto the stone (careful not to burn yourself) until it is in your desired shape (I like mine in a flat circle - call me crazy).

Place the pizza crust into the oven and bake for 10-12 minutes or until beginning to brown.

Place your toppings (including spreading your creamy sundried tomato pesto - recipe to follow) onto the crust. Place back into the oven and continue to bake for 5-10 more minutes or until cheese is melty/veggies nicely browned.

Creamy Sundried Tomato Pesto
  • 1/4 cup sundried tomatoes (packed in oil or water or dried + rehydrated)
  • 1 cup marinara sauce
  • 1/4 cup tahini paste
  • 1 cup fresh packed basil
  • 1 Tbsp lemon juice
  • 1 large dollop of agave
  • 1 Tbsp sriracha (optional)
Place all ingredients into food processor and blend until smooth! You shouldn't need to add oil or liquid because marinara sauce is more watery than pizza sauce - it should have a nice consistency :)


Yum yum yum! This was DELICIOUS. Colin and I ate the whole thing. I could have eaten the whole thing by myself. EASY.

Live long and prosper! And get crazy with your Pinterest recipes!!

Tuesday, April 9, 2013

15-Minute Farro Salad


I love making grain-based salads.

They make great bases for barbequed tempeh, grilled veggies or veggie burgers, or even oven-roasted tofu.

You can take them to any kind of pot-luck, barbeque or event.

There are infinite varieties of grains, veggies, herbs, beans, sauces and spices that can go into them, and there is always room to personalize or incorporate seasonal veggies!

Plus they are EASY, TASTY, HEALTHY and look great!

In this particular take, I utilized Trader Joe's BRAND NEW "10-Minute Farro"
It comes in this pretty little blue bag (but you could just as easily use the 10-minute barley or 10-minute bulgar or even just good ol' fashioned quinoa)

Then, I sauteed up some onions and garlic with a nice dollop of coconut oil

While the above two things were on the stove, I diced up some tomatoes, chopped some kale and chiffonaded some fresh basil (could use any type of fresh herb here!)

For the sauce, I just mixed together some tahini with a bit of lemon, balsamic vinegar and agave in a small bown (for brightness and sweetness) (again, you could use ANY type of sauce here - even pre-made/store bought!)

Then, when the farrow was done cooking, I mixed in the onion and garlic and then tossed it with the tomatoes, kale, basil, fresh edamame beans and finally, stirred in the sauce.

The heat form the farro wilts the kale beautifully - just enough that the bitter, crunchy edge is lessened.

Give it a few good mixes and you are good to go. A gourmet, customized hearty and uber-healthy salad ready for dinner, to keep in the fridge for the week's lunch, to serve up as a side at a BBQ or to take to a potluck! (Can you tell I'm ready for spring!)


Enjoy!!

Live long and prosper! And remember that sometimes the most delicious and nutritious things are also the simplest!


Tuesday, March 26, 2013

One-Pot Gluten Free Eggplant Parmesan


Colin decided a couple weeks ago that he wanted to try being gluten free. My initial response was something along the lines of "ummmm...why?" and then, without pause: "you know that beer has gluten in it, right?"


Yes, he knows that beer has gluten in it, but still, he insisted, there might be something to this gluten free thing.


My knee-jerk reaction was to dismiss gluten-free as a near impossibility while also being vegan, but between living in Portland and the endless dept of the blogosphere, I knew that was a total cop-out.

Instead, I decided to embrace the GF diet as a challenge and an educational opportunity. I mean, as a self-proclaimed foodie, cook, and health nut, how could I ignore understanding the gluten-free lifestyle and at least learning to cook a few dishes GF?

Plus! Wine is still gluten-free so it can't be all that bad, right :)?

Well it was bad for me when it came to pancakes. I completely failed at pancake making. And I spent nearly an hour researching oats to understand whether or not they are gluten free. And Clif Bars. And a myriad of other things I literally had no idea about, but I won't completely bore you with the details.

Like I said, it was an educational opportunity.

One dish that did go particularly well and was super simple + healthy was this "one-pot" eggplant parmesan.

I was having a particularly lazy night, but I really wanted to make eggplant parmesan so instead of slicing, battering, breading, and then baking each individual slice of eggplant, only to then cover it with marinara sauce and cheese and bake it someone, I decided to just cut out some of the steps.

GF Eggplant Parm
  • 1 Tbsp coconut oil
  • 1 medium eggplant, sliced and salted (do this 1-2 hours ahead of time if possible!)
  • 1 tsp cayenne pepper
  • 1 cup GF bread crumbs, either store bought or homemade. I used something similar to these (which, admittedly, were like $8 so if I did it again I would probably make them myself)
  • 1 jar YOUR favorite marinara sauce
  • 1 cup vegan cheese (I used Trader Joe's new brand in place of Daiya and loved it!!)

Preheat the oven to 425 degrees

Spread the coconut oil evenly across the bottom of the pot and then layer the eggplant as evenly as you can (see: my gorgeous Le Creuset cast iron pot that Colin got me for Christmas!!) Sprinkle cayenne and any other seasonings over the top.

Place the pot in the oven for about 15 minutes until the eggplant slices have softened and are beginning to brown.

Pull the eggplant out and let it cool briefly. Then, take the bread crumbs and spread/stir them into the eggplant, trying to get all the slices covered as evenly as possible. Then, place the eggplant into the oven for another 10 minutes.

After the breadcrumbs have had a chance to "set," take the pot out of the oven and dump your jar of marinara sauce right over the top, followed by the cheese.


Continue to bake for another 15 or so minutes or until a cheese, delicious layer has formed and the sauce is beginning to brown at the edges of the pot.

Should look kinda like that :)

Allow to cool for a few minutes before spooning onto a plate.

I will warn you! This version is not as firm as the fried or individually breaded original, but it tastes just as good or better and it will save you so much time!

With the right seasoning and marinara sauce, this dish is a piece of gluten-free cake!


Stoked on the GF challenge. But I am not convinced it is the right choice for us long-term. It's been a GREAT learning experience and I will definitely incorporate a lot of what I learned into my day-to-day cooking and am SO happy to have learned how to cook GF for all my friends with intolerances, but for many reasons (summed up nicely in this article) I don't think GF is a forever lifestyle for me!


Live long and prosper. And don't be afraid to challenge yourself!

Tuesday, February 5, 2013

Cauliflower Hot Wings


Exciting News! This is my 100th blog post!!

Can you believe it? I can't.

I really wanted to have this post done BEFORE the superbowl, but school has sucked every ounce of my free time for the past several weeks and my family had to put our 14 year old goldren retreiver down, so I'm just finally getting to it!

But the good news is - this is a REALLY awesome post.

I mean, cauliflower hot wings?! 

I honestly don't know how I've gone my entire life without eating these. I haven't had wing sauce in YEARS. Turns out...I really like it. Like by the spoonful directly into my mouth like it. 

So these 'wings' are a fun and super healthy way to get the satisfying experience of hot wings without the fat, cholesterol or guilt.

And they are gluten free! Which is great because I've been dabbling more in GF cooking. Fun challenge! 
Oh and one more thing: I chose to bake my hot wings but you could just as easily deep or pan fry them to get a more 'authentic' wing taste. It's up to you. 

I told you this was a special post :)


 Cauliflower Hot 'Wings'
  • 1 large head cauliflower, chopped into pieces
  • 1 bottle Franks Red Hot - Wing Sauce
  • 1/4 cup Earth Balance
  • 1 cup non-dairy milk (I used almond)
  • 3/4 cup chickpea flour
  • 1 tsp garlic powder
  • 1 tsp onion powder
Preheat the oven to 450°F.

Lightly spray a large non-stick baking sheet with oil.

Combine the flour, and onion/garlic powder in a bowl and stir until well combined.

Coat the cauliflower pieces in soymilk and then with the flour mixture. Place on the baking sheet and bake for 20 minutes or until crispy.

While the cauliflower is baking, combine the hot sauce and earth balance in small saucepan on the stove top and heat over low heat until the Earth Balance is completely melted.

When the cauliflower is looking crispy and lightly browned - pull it out of the oven and place it in a large bowl. Pour the hot sauce mixture over it and toss to coat.


Bake for an additional 5 minutes or until you reach your desired level of crispiness.

Serve ASAP!


In other fun news - a friend of mine made some delicious vegan 'hedgehog' cookies for the party.

I thought they were so cute and delicious I had to take a picture. I didn't get the recipe from her but I'm sure if I bugged her I could wrangle it out so if anyone is interested let me know!! They are so fun!

See? So cute!

They really did look like hedgehogs.

I think I ate half the plate...


All right, lovers! Hope you had a beautiful and fun superbowl and that you were as upset as we were that the niners lost!! Made for a long night, I'll tell ya!

Live long and prosper. And happy 100th post anniversary to me!